
Table of Contents
- Understanding Kitchen Layouts for Small Spaces
- Galley Kitchen Layouts: Efficiency in a Linear Design
- L-Shaped Kitchen Configurations: Maximizing Corner Space
- Small Kitchen Storage Solutions That Work
- Optimizing the Kitchen Work Triangle for Small Spaces
- Budgeting Your Small Kitchen Remodel
- Design Elements That Make Small Kitchens Feel Larger
- Frequently Asked Questions
Last Updated: September 24, 2026
Understanding Kitchen Layouts for Small Spaces
Custom kitchen layouts for small spaces demand strategic planning that balances functionality with flow. A well-designed layout reduces wasted movement, maximizes storage, and creates the illusion of openness. At B&G Home Improvement Inc., we've helped homeowners in Carrboro, Chapel Hill, and Durham transform cramped kitchens into efficient, beautiful spaces.
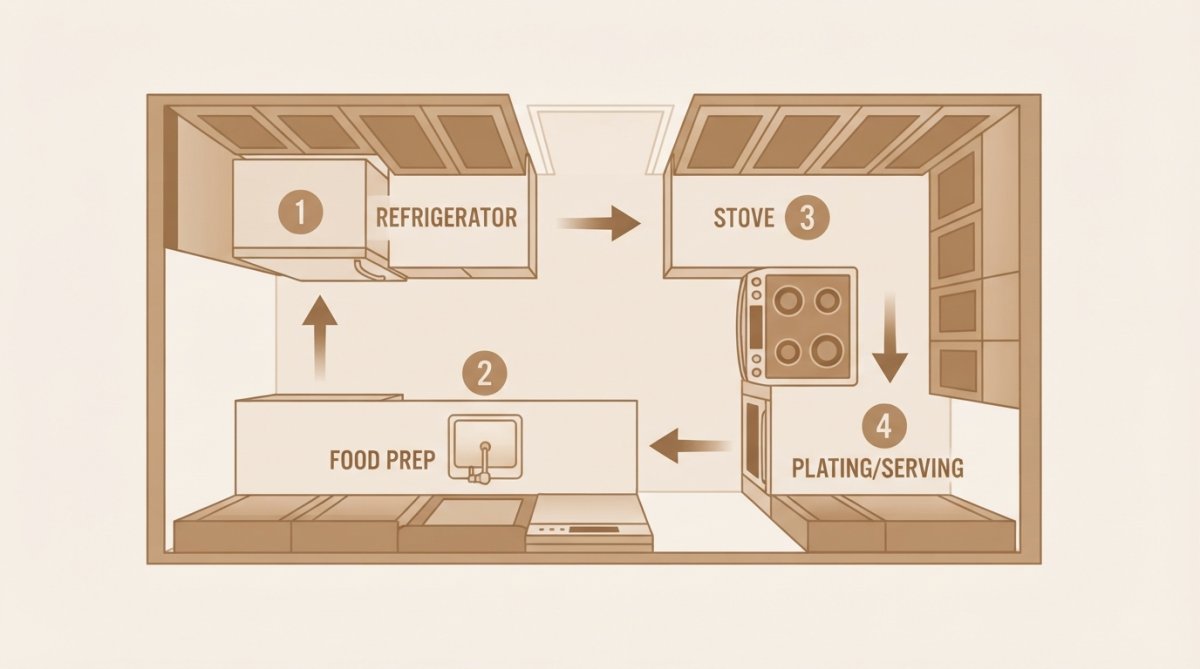
Start with the work triangle, the imaginary line connecting your sink, stove, and refrigerator. This triangle determines whether your kitchen feels cramped or flows naturally. Small kitchens can't afford dead zones or wasted corner space; every element must earn its place.
Galley Kitchen Layouts: Efficiency in a Linear Design
A galley kitchen uses two parallel walls 4 to 6 feet apart, close enough to reach across, far enough to open cabinet doors without hitting the opposite wall. It's the most efficient layout for small spaces because it minimizes the work triangle and keeps everything within arm's reach.
Place your sink on one wall and your stove on the other, with the refrigerator anchoring one end. The linear design means traffic flows in one direction, an advantage in a small space.
Common mistake: putting the refrigerator between the sink and stove. This breaks the work triangle and forces you to walk around an open door every time you cook. Put the refrigerator at the end of one wall instead.
Install task lighting above countertops to combat shadows from parallel walls. Bright, even light makes the space feel larger and safer.
L-Shaped Kitchen Configurations: Maximizing Corner Space
An L-shaped kitchen uses two perpendicular walls, creating a corner that offers more flexibility than a galley. A corner cabinet with a lazy Susan or pull-out shelving system can store items that would otherwise be dead space. Custom kitchen layouts for small spaces should treat the corner as premium real estate.
Position your sink at the corner or along one wall, your stove on the other, and your refrigerator at the end of one leg. The second leg can accommodate a small island, open shelving, or additional counter space, creating a defined dining or prep area separate from the cooking zone.
Small Kitchen Storage Solutions That Work
Storage is where custom kitchen layouts for small spaces either succeed or fail. You can't add square footage, but you can add vertical storage and reclaim dead space through strategic organization.
Vertical Storage: The Foundation of Small Kitchen Efficiency
Floor-to-ceiling cabinetry maximizes every inch. Upper cabinets should extend to the ceiling, a gap above standard 36-inch uppers wastes 12-18 inches of storage per linear foot.
Use space above 72 inches for decorative or seasonal items.
Open Shelving vs. Closed Cabinetry: The Trade-Off
For small kitchens, a 70/30 split works best: closed cabinetry for the majority of storage, open shelves for everyday items. Open shelves require discipline, items must be organized and attractive. A single wall of open shelves (3-4 linear feet) is usually the maximum before visual clutter becomes a problem.
Specific Storage Solutions and Their Measurements
Corner Cabinets and Carousels Corner cabinets waste 12-18 inches of depth. Solutions include lazy Susan carousels, pull-out corner systems, or blind corner pull-outs for pots and pans. A basic lazy Susan is better than leaving the corner empty.
Under-Sink Organization Under-sink space (typically 24-30 inches wide, 24 inches deep) is premium real estate. Use pull-out baskets, tiered shelf risers, door-mounted organizers, or integrated trash pull-outs. Keep plumbing access clear, don't block the P-trap or shut-off valves.
Vertical Wall Storage Walls are underutilized storage. Options include pegboards, magnetic strips, hooks and rails, or floating shelves. Floating shelves create visual lightness compared to bulky cabinetry.
Drawer Dividers and Interior Organization Maximize drawer space with utensil dividers (a 24-inch drawer holds 40-60 utensils with dividers vs. 15-20 without), tiered shelf risers, pull-out baskets, and stackable containers for dry goods.
Pantry Solutions for Kitchens Without a Pantry Create pantry storage with a narrow pull-out cabinet, over-the-refrigerator cabinet, vertical spice racks, or stackable pantry containers.
Accessibility and Universal Design Considerations
For accessibility, keep items used daily between 24 and 54 inches from the floor. Use pull-out systems over deep cabinets, prioritize drawers over cabinet doors, and maintain at least 30 inches of clear floor space for safe movement.
Storage Efficiency Metrics
Call the Expert Renovation Contractors Now →
A 24-inch-deep floor-to-ceiling cabinet provides roughly 18 cubic feet of storage per linear foot of wall. Eliminating dead space in corners and above upper cabinets can reclaim 15-20% of total capacity. Items used daily should require one motion to access; monthly items can require two motions.
Optimizing the Kitchen Work Triangle for Small Spaces
The work triangle, connecting sink, stove, and refrigerator, should total 15-26 feet, with each leg between 4 and 9 feet. In small kitchens, 15 feet is ideal. Avoid placing the sink in a corner, putting the refrigerator between sink and stove, or creating a triangle that forces traffic through the cooking zone. Test your layout on paper before committing.
Budgeting Your Small Kitchen Remodel
Small kitchen remodels are costly because every square inch is premium. Understanding where money goes requires breaking down costs by layout decision.
Layout-Focused Budget Breakdown
Small kitchen remodels fall into three cost tiers: Tier 1 keeps utilities in place, including new cabinetry, countertops, and lighting. Tier 2 moves one utility (sink or stove). Tier 3 moves multiple utilities or restructures walls.
DIY vs. Professional: Where You Can Save
DIY-friendly tasks include painting, hardware installation, backsplash tile, open shelving, and drawer organization (save 20-40% on labor). Professional-required tasks include plumbing relocation, electrical work, structural changes, gas line work, and countertop installation. Attempting DIY plumbing or electrical work often costs more to fix than hiring a professional initially.
Prioritization Framework for Budget Allocation
Set a realistic total budget and work backward from your priorities:
-
Identify non-negotiable layout changes. Does your work triangle need fixing? Do you need better storage? Can you keep utilities where they are? This determines which tier you're in.
-
Allocate 50-60% to cabinetry and storage. In small kitchens, storage efficiency is the biggest functional gain. Quality cabinetry with smart pull-outs, lazy Susans, and vertical organization delivers more impact than high-end finishes.
-
Allocate 15-20% to countertops and backsplash. These are visible and durable, but they're secondary to layout and storage in a small space.
-
Allocate 10-15% to appliances. Compact, efficient appliances are important, but you don't need premium brands. Focus on size and function for your layout.
-
Allocate 10-15% to lighting and finishing touches. Lighting design matters more in small kitchens, but this is where you can find savings if budget tightens.
-
Reserve 10-15% contingency. Old kitchens hide surprises: water damage, outdated wiring, walls that aren't square, plumbing that doesn't meet current code. Contingency prevents mid-project budget crises.
Questions to Ask Before Committing to a Layout
- Can I keep my sink, stove, and refrigerator where they are? (Yes = significant savings)
- Do my current utilities meet code, or will updates be required regardless? (Updates required anyway = less incremental cost to relocate)
- Is my kitchen on a single floor with utilities running underneath, or is it above a basement/crawlspace? (Basement access = easier and cheaper relocation)
- Am I doing a full renovation or a layout-focused update? (Full renovation = spread costs across more elements; layout-only = utilities become a larger percentage of total cost)
Small kitchens don't have to mean small budgets, but smart layout decisions, keeping utilities in place, maximizing vertical storage, and prioritizing function over finishes, let you achieve significant improvements within realistic financial constraints.
Design Elements That Make Small Kitchens Feel Larger
Layout is function, but design creates feeling. A small kitchen can feel spacious with the right color palette, lighting, and visual tricks.
Light colors on walls and cabinetry reflect light and create the illusion of space. White, soft gray, and pale beige are classic choices. Dark colors absorb light and make rooms feel smaller.
Frequently Asked Questions
What is the most efficient layout for a small kitchen?
The galley kitchen layout is often the most efficient for small spaces because it creates a direct work triangle between the sink, stove, and refrigerator. This layout minimizes wasted movement and keeps everything within arm's reach. L-shaped configurations also work well when you have a corner to utilize. The key is ensuring adequate aisle clearance, at least 36 inches between counters, so you can move comfortably while cooking.
How can I customize a small kitchen layout to increase storage?
Vertical storage is your best strategy in small kitchens. Install floor-to-ceiling cabinetry, use upper cabinets above appliances, and consider open shelving for frequently used items. Pull-out drawers and corner carousels maximize hard-to-reach spaces. Pantry organization systems and magnetic strips for knives also free up counter space. Custom kitchen layouts that include a tall pantry cabinet or corner storage solutions can dramatically increase your usable storage without expanding your footprint.
Can you put an island in a small kitchen layout?
Yes, but it requires careful planning. A custom kitchen island for small spaces typically works best if your kitchen is at least 150-200 square feet. The island should be no larger than 24-36 inches wide and positioned to maintain at least 42 inches of clearance on all sides for traffic flow. Narrow islands with storage underneath or a built-in seating area can serve multiple functions without overwhelming the space.
What are common mistakes to avoid in small kitchen design?
Avoid choosing appliances that are too large for your space, which disrupts traffic flow and reduces countertop space. Don't ignore lighting design, poor lighting makes small kitchens feel cramped. Overcrowding with upper cabinets can create visual weight. Failing to plan your work triangle results in inefficient movement. Finally, selecting dark colors or heavy cabinetry styles can make a small kitchen feel boxed in. Work with a professional to balance function, aesthetics, and spatial efficiency.
Comments